Break vs Reclaim: When You Separate Them, You Chase Less
Separating Break from Reclaim gives you a reason to wait—so you chase less.
When the market snaps, the pressure hits fast: “If I don’t enter now, I’ll miss it.” Most chasing starts when Break and Reclaim are mistaken as the same event.
One-line takeaway
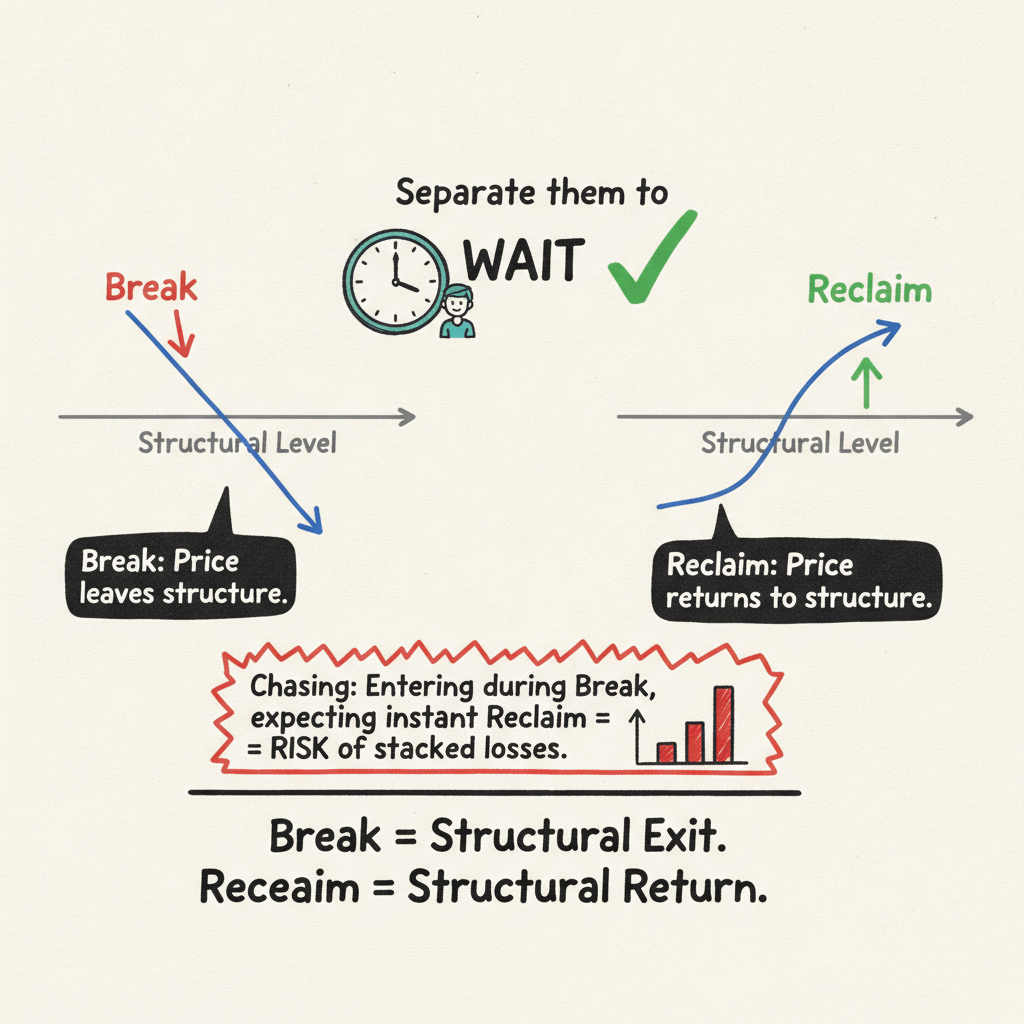
Break is structural exit. Reclaim is structural return. When you separate them, you gain a reason to wait instead of chase.
Why do they get mixed up?
- Break is the moment price leaves structure.
- Reclaim is when price returns to that structure.
- On the chart, they often appear in the same burst of candles. That’s where chasing begins. If you enter during the Break expecting a quick return, a second breakdown stacks losses fast.
The structure view (Bias → Context → Trigger)
1) Bias (Direction)
- Check if higher TF structure is still intact.
- If Bias is broken, don’t assume a Reclaim.
2) Context (Meaning)
- Decide whether the Break is a true breakdown or temporary shake.
- A Reclaim only matters when context still holds.
3) Trigger (Entry)
- Reclaim is a return, not an entry signal.
- The trigger comes after the return is confirmed.
Checklist (copy/paste)
- Did I separate Break (exit) from Reclaim (return)?
- Is higher TF Bias still valid?
- Is this Break structural, or just a shake?
- Did I confirm structure after the Reclaim?
- Is the entry after confirmation, not immediately?
- Is my risk defined by structure boundaries?
Summary
- Break and Reclaim are different events.
- Separating them reduces chasing and creates a reason to wait.
- Structure-first thinking delays entries—but makes them cleaner. If you want a faster structural read, 1K Scanner’s multi-timeframe view helps a lot.
Related content
Why Wyckoff Phases Must Be Read on HTF: Historical Context and Practical Use
The Same Questions in Wins and Losses: It Wasn’t the Stop, It Was the Question
Failure Study (20): Why practical mistakes repeat and how to correct them
Why MTF makes structure visible (and noise quieter)
Why the Same Pattern Can End Differently: A 3-Step Context Routine
BTC 4H: Structural break and how it looked in 1K Scanner
BTC 4H: Structural break and how it looked in 1K Scanner
A clean 4H structure break and the checklist that made it obvious in 1K Scanner.
Here’s the short version: this wasn’t just a dip — it was a structure break.
What changed on 4H
- Higher‑low sequence failed
- Prior demand didn’t hold on the retest
- The reaction was weak, volume didn’t defend the level That combination is the red flag. One signal is noise. Three together means a shift.
What we confirmed in 1K Scanner
- Break of the last clean swing low
- Retest candle rejected at the same zone
- MTF alignment: lower TF rolled while higher TF stopped making higher lows
How we used it
This isn’t “short every break”. It’s wait for break + failed reclaim. That’s the difference between getting chopped and catching the move.
Checklist we used:
- Break of key swing
- Failed reclaim on retest
- MTF misalignment confirmed
- No strong volume defense The screenshot is a placeholder. Real chart coming soon.